

REPAIRING THE VICTOR EXHIBITION SOUND BOX
Victor Exhibition Reproducer Rebuild
The sound box is the heart of your phonograph. Common problem with this soundbox is that the gaskets (rubber insulators) had dried out and became stiff and hard. If the soundbox of your phonograph look like this, do something and repair it...

You should disassemble your reproducer and replace both the inner and outer gaskets. Also remove rust of the reproducer and oil slightly all metal parts. Here is a original manual by the Victor Talking Machine Company from 1914. Be careful with all those tiny parts!

Causes for poor Results in sound
1. Rubber insulators buckled.
2. Diaphragm not centered, causing it to touch the soundbox cap.
3. Fulcrum bearings of needle arm not set on fulcrums of the sound-box cap.
4. Needle-arm foot pressing on the diaphragm.
5. Needle-arm foot pulling on the diaphragm.
6. Needle-arm foot not securely fastened to the diaphragm.
7. Adjusting or lock nuts loose.
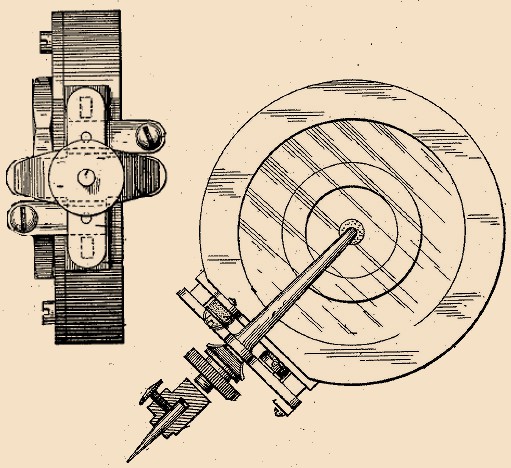
Fig.1 - Tools Necessary

1 Waxing Iron, No. 1847A
1 Diaphragm Piercer, No. 1487
1 Jeweler´s Screw-driver No. 1486
1 Box Wax, No. 804A
1 Adjusting Nut Wrench, No. 1846
1 Camel´s Hair Brush
1 Waxing Iron, No. 1847A
1 Diaphragm Piercer, No. 1487
1 Jeweler´s Screw-driver No. 1486
1 Box Wax, No. 804A
1 Adjusting Nut Wrench, No. 1846
1 Camel´s Hair Brush
Fig. 2 - Victor Exhibition Sound Box Parts
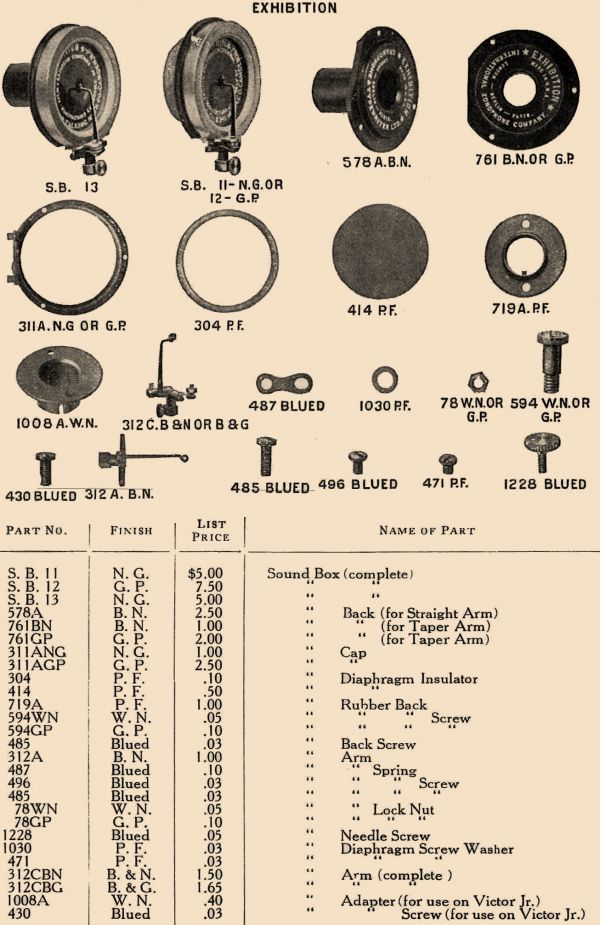

Repairing the Victor Exhibition Sound Box
1. Place a new rubber insulator (No. 304, Fig. 2) in the cap or top (No. 311A, Fig. 2) of the sound box, with the two ends of the insulator directly in the center of the sound-box cap fulcrum plate. (See Fig. 3)

2. With the small camel´s hair brush place a little orange shellac around the top of the rubber insulator to hold the diaphragm in position.
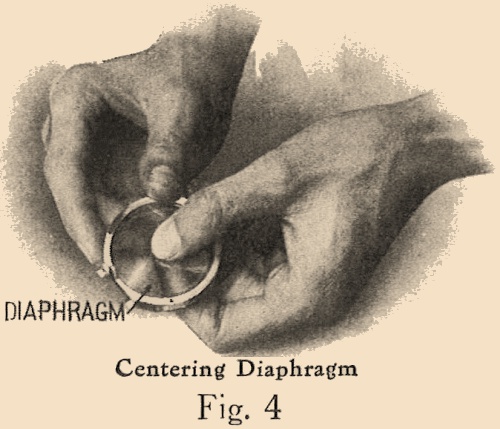
3. Place the diaphragm (No. 414, Fig. 2) on the rubber insulator, making sure that the diaphragm is centered, i.e. clears the cap on all sides. This is important. Let the shellac dry - requires about one minute. (See Fig. 4)
4. Place the second rubber insulator in position on top of diaphragm with the ends of the insulator exactly opposite the ends of the insulator under the diaphragm.
5. Place the sound box back (Nos. 761 or 578A, Fig. 2) in position, tightening the three small screws (No. 485, Fig. 2) securely in position.
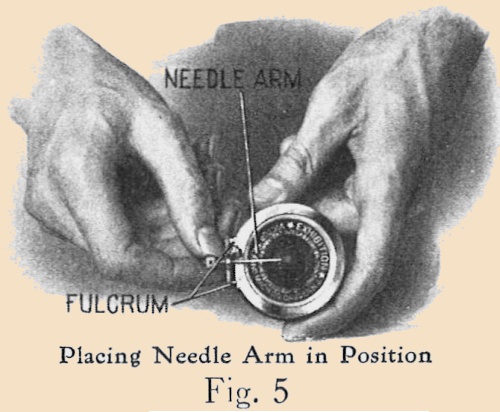
6. Then place the sound box thus assembled in the left hand, with the thumb and first finger encircling the cap (see Fig. 5), and place the needle arm (No. 312C, Fig. 2) in position, being careful to see that the arm is properly set or adjusted on the fulcrums of sound box cap. (See Fig. 5)
7. With Sound-box arm in position, tighten both sound-box arm screws (No. 496, Fig. 2) sufficiently to bring the needle-arm foot flat on the diaphragm.
Careful attention should be given to this operation to see that the needle arm does not press tightly on the diaphragm or that it does not stand away from the diaphragm. For proper results the arm should barley touch the diaphragm. This may be accomplished by tightening the upper screw to lower the arm on the diaphragm.
8. When screws are properly adjusted, tighten the lock-nuts (No. 78, Fig. 2); (see Fig. 6) with tool No. 1846 (see Fig. 1) to prevent the adjusting screws (No. 496, Fig. 2) from changing their positions.

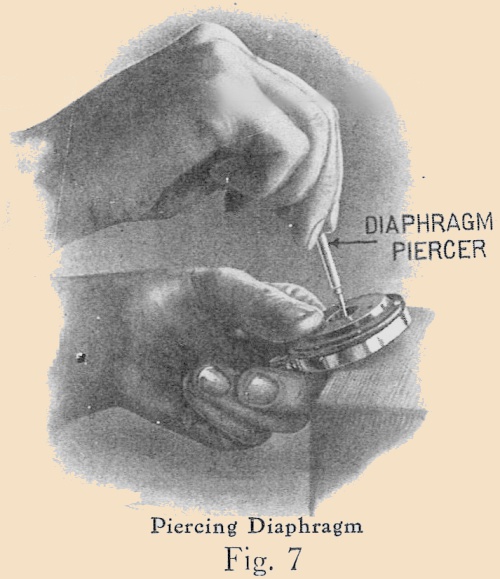
9. With the soundbox inverted, resting on a table or bench and held firmly in the hand, pierce the diaphragm by running a sound-box piercer (tool No. 1487, illustrated in Fig. 1) through the diaphragm at the point where the piercer will also run through the needle-arm foot. (See Fig. 7)
10. With the sound box in the same position run a tap, using No. 00-112 standard size, through the diaphragm and needle-arm foot, tapping the diaphragm for the insertion of the diaphragm screw (No. 471, Fig. 2).
11. Place small paper washer (No. 1030, Fig. 2) on the diaphragm connection screw, and with the sound box in the same position insert the diaphragm connecting screw and tighten securely.
12. Heat the sound-box waxing iron (tool No. 1847A, Fig. 1) over an ordinary gas jet about one minute, dip into the box of sound-box wax (No. 804A, Fig. 1). Place the waxing iron over the sound-box needle-arm foot (as illustrated in Fig. 8), and permit the wax to run off on top of the foot. Then turn the sound box over and repeat the operation by placing a drop of wax over the connection screw head. (No. 471)
13. If taper arm sound box, place the rubber back (No. 719A, Fig. 2) in position.
14. Place the needle-arm thumb screw (No. 1228, Fig. 2) in arm.
15. Test carefully for proper adjestment by playing a record with which you are familiar, If the tone of sound box is heavy, relieve the pressure by slightly releasing the upper screw (No. 496, Fig. 2). It requires but half a turn sometimes to accomplish the desired results. If the sound box rattles, try tightening the upper screw slightly.


Important Notice
In consideration of the care and attention given to the manu-
facture of Victor Sound-box parts, We are naturally disap-
pointed When we find our Distributors or Dealers using repair
parts on our sound boxes which have not been made and tested
by our own factory.
Invariably, when parts of other makes are put into our
sound boxes, the efficiency of the box is lowered below the Victor
Standard, and in all probability the box will fail to reproduce
properly.
As a result, the Victor user becomes disgusted with what
he thinks is “Victor Quality,” when in reality the “Victor
Quality ” is all right, but it cannot overcome the handicap of
inferior parts which have been placed in the mechanism against
the wishes of the Victor Talking Machine Company.
Remember that all the screws, nuts, diaphragms, and other
component parts of the sound box are made to a fixed gauge, and
the possibilities all are, if parts manufactured outside the Victor
factory are installed in Victor sound boxes, that they will not fit
properly.
NO!
* Do not poke at the mica diaphragm with your finger or with a sharp implement. It is tough and durable, but may be injured through abuse.
* Do not leave the sound box down on the turntable when your Victrola is not in use. Turn it back onto the sound box rest.
* Do not drop the sound box onto the record. When starting to play, lower the sound box gently.
Bad Reproduction of your Sound Box
* A loose needle is a frequent cause of a noisy sound box, hence if your Victrola reproduces improperly see that the needle is securely fastened in its holder.
* If you are using steel needles, put in a new needle after every record. Using a steel needle more than once injures the record.
* If a sound box noise should develop and if tightening or changing the needle does not eliminate it, and if the noise persists with various records, it is possible that the sound box is injured, or out of adjustment. You may replace the rubber gaskets and diaphragm. Read above
Use needles only once with a phonograph record!
Über Uns
Wir sind mehr als ein Forum! Als eingetragener Verein arbeiten wir an der Beständigkeit unserer Leidenschaft.
Über unsWir suchen Dich!
Du schreibst Artikel, möchtest im Forum als Moderator aktiv werden? Dir liegt Social Media. Bewahre Wissen! Wir warten auf dich.
Schreib unsTipps
Einsteiger-Ratschläge für optimale Nutzung und wichtige Aspekte beim Grammophon und Schellackplatten-Kauf.
Zu den Informationen